How to Set Up Raspiaudio Audio+ on Jetson Nano
The Jetson Nano developer kit is a powerful device for AI and robotics. However, it doesn't have any sound card by default, which means you can't hear audio. To solve this, you need to connect a sound card. In this guide, we'll use the Raspiaudio Audio+ board, which is a high quality sound card designed for Raspberry Pi and compatible with the Jetson Nano.
This guide will walk you through all the steps to set up the Raspiaudio Audio+ on your Jetson Nano model B02 (2019). In the end, you'll be able to hear audio playing on the Jetson Nano thanks to the audio jack of the Raspiaudio Audio+ board!
Before You Start: Jetson Nano Model and Audio+ Compatibility
Your Jetson Nano needs to be set up first. If you haven't done this, follow NVIDIA's official setup guide first. You should be able to start your Jetson Nano, connect it to a monitor and keyboard, and be on the desktop.
What you'll need: Your Jetson Nano B02, the Raspiaudio Audio+ board, and a way to connect them (the 40-pin connector should fit right onto the Nano). Make sure the Audio+ is pushed down firmly onto the pins so all the metal parts connect.
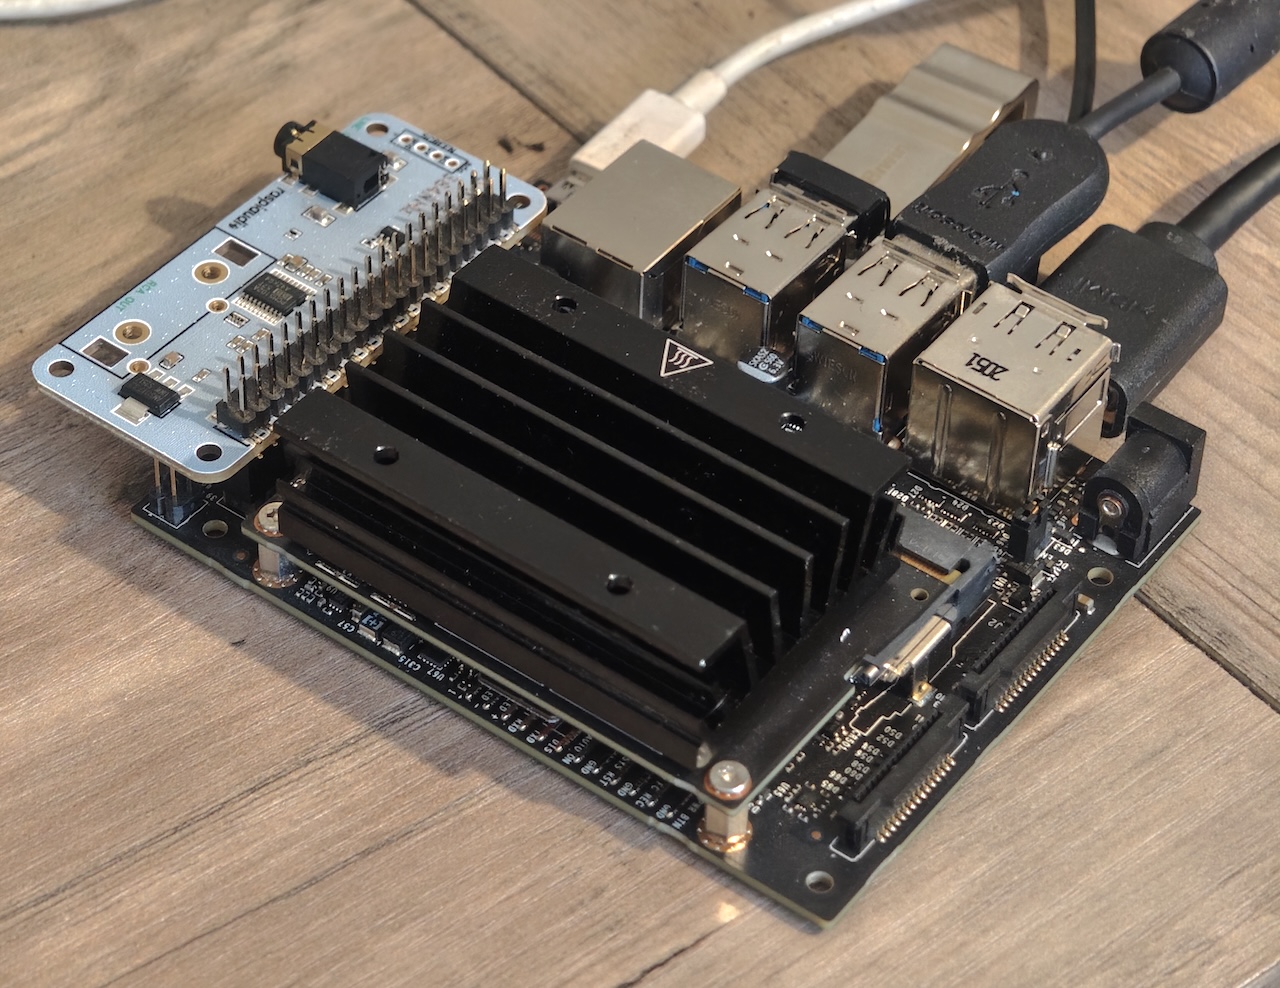
This guide was tested on the Jetson Nano B02 model (2019), which is a developer kit. It's also called the P3450 model, or 3448 + 3449. The Jetson Nano model has a characteristic heatsink for cooling (instead of fans like the more recent models), and the B02 model has a row of pins that look like a little "bay" sticking out (unlike the older A01 model).
If you have the older A01 model or a more recent Jetson model, this guide won't directly apply but can be used as a reference. Feel free to share your tips and tricks in the raspiaudio community!
Special thanks to jas-mx from this forum post for inspiring this guide.
Step 1: Turn On the Audio Pins
Your Jetson Nano doesn't know those audio pins are supposed to be used for sound yet. Let's tell it. Switch on the Jetson Nano, connect it to a monitor and keyboard, and open a terminal. Run this command:
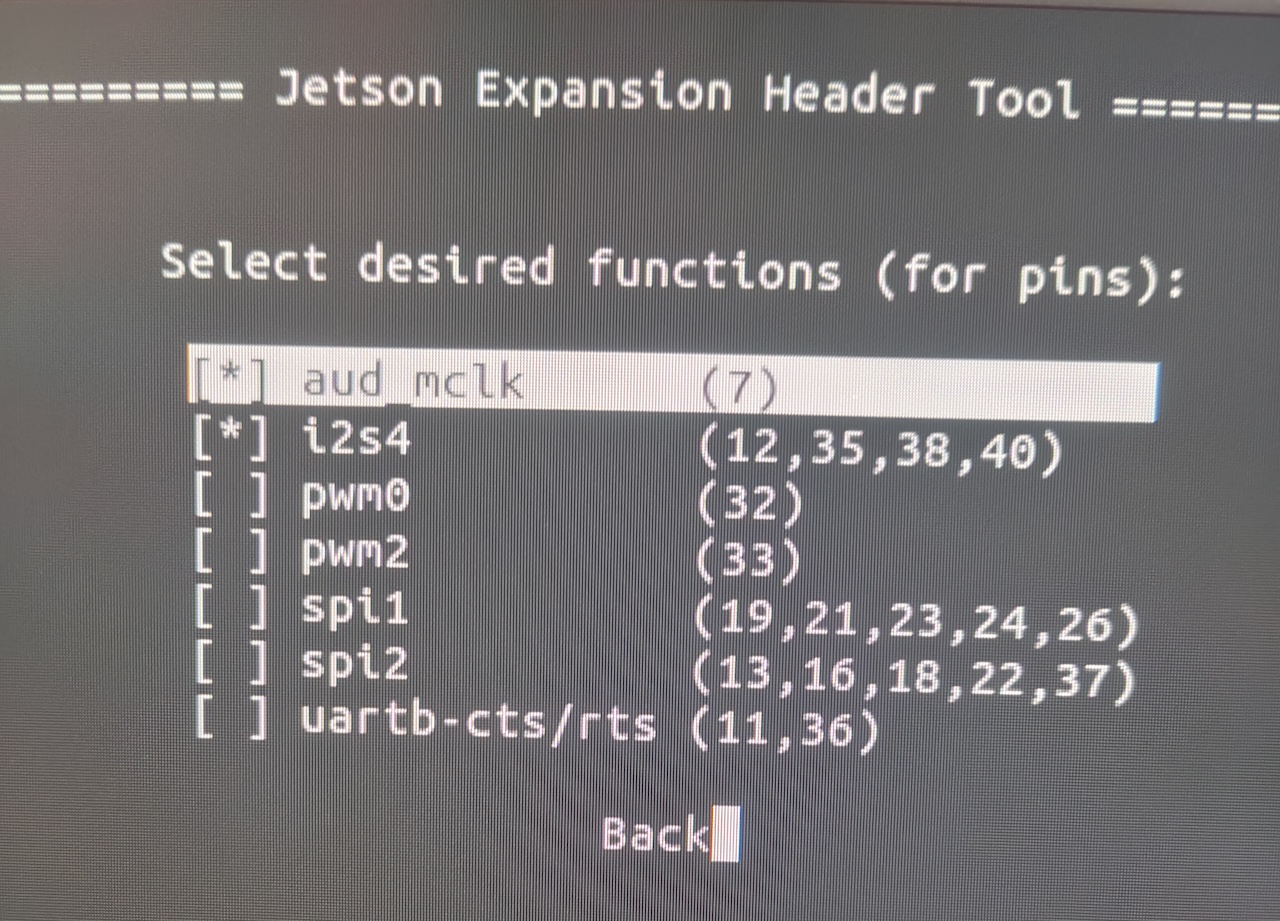
sudo /opt/nvidia/jetson-io/jetson-io.pyThis opens a screen with menus. Here's what to do:
- Use the arrow keys (up/down) to highlight "Configure Jetson 40pin Header" and press Enter
- Select "Configure header pins manually" and press Enter
- You'll see a list with checkboxes. Find "i2s4" (it shows pins 12,35,38,40) and "audio_mclk" (shows pin 7). Press Space to put an asterisk [*] next to each one to select them.
- Select "Back"
- Select "Save pin changes"
- Select "Save and reboot to reconfigure pins"
Your Jetson Nano will restart. This creates a special configuration file that tells the system how to use those pins for audio. This generates a DTB overlay file at /boot/kernel_tegra210-p3448-0000-p3449-0000-b00-user-custom.dtb
Step 2: Check If the Pins Are Working
After rebooting, let's verify the pins are in the right mode:
sudo cat /sys/kernel/debug/tegra_gpio | grep "J:"You should see: J: 2:1 00 00 00 00 00 00 000000
If you see "f0" anywhere (like "f0 00 00"), the fix below is required.
The "00" means pins are in Special Function mode for I2S audio. "f0" means they're stuck in GPIO mode.
Step 3: Fix the Pins (if needed)
Many B02 models have a bug where the pins don't switch to audio mode properly. Here's the fix:
sudo busybox devmem 0x6000d204 32 0This command forces the pins into the right mode. However, when your restart, they go back to GPIO mode. To make this more permanent, we'll make this happen automatically every time you turn on your Jetson Nano using a systemd service. To do that, run this command:
sudo tee /etc/systemd/system/fix-i2s4-pins.service <<EOF
[Unit]
Description=Fix I2S4 Pinmux for Jetson Nano
After=local-fs.target

[Service]
Type=oneshot
ExecStart=/bin/busybox devmem 0x6000d204 32 0
RemainAfterExit=yes

[Install]
WantedBy=multi-user.target
EOF
This creates a startup service that writes to the GPIO configuration register 0x6000d204, forcing Port J pins into SFIO mode for I2S4.
Now, let's enable and start the service:
sudo systemctl enable fix-i2s4-pinssudo systemctl start fix-i2s4-pinsThe two commands above should return no errors. If you see "Failed to start fix-i2s4-pins.service: Unit not found," it means the service wasn't created correctly. Check the error logs:
sudo journalctl -u fix-i2s4-pinsStep 4: Connect the Audio to the Sound Card
Now connect the I2S4 interface to the audio system:
amixer -c tegrasndt210ref cset name='I2S4 Mux' ADMAIF1You should see output ending with values=1. If you get an error about "Invalid card," the audio driver isn't loaded - you may need to reboot and try again.
This routes the I2S4 audio stream to the ADMAIF1 interface, connecting the hardware pins to the sound driver.
Step 5: Test Your Audio
Finally, let's play a test sound. This command sends a 48kHz stereo sine wave through the I2S4 interface.
speaker-test -D hw:tegrasndt210ref,0 -r 48000 -c 2 -F S16_LE -t sineYou should hear a continuous tone from your headphones or speakers. Press Ctrl+C to stop it.
How to Confirm the Audio+ Board Is Working
If you heard a sound, your Raspiaudio Audio+ should now be fully working on your Jetson Nano B02. The configuration will survive reboots thanks to the service we created in Step 3.
Extra: How to Flash Your Jetson Nano with the Custom DTB
The method above works for one device, but if you need to flash multiple Jetson Nano boards for production, it quickly becomes tedious to navigate the jetson-io menus. To avoid this, you can use the DTB (Device Tree Blob) file created in Step 1 to flash your Jetson Nano with the correct pin configuration already set up.
/boot/kernel_tegra210-p3448-0000-p3449-0000-b00-user-custom.dtbSave this file to your computer. When reflashing, copy it back to the /boot/ folder before the first boot.
This DTB file is specific to your own version of the Jetson Nano, either A00 or B02. You can see the version at the end of the filename. Flashing a different version can break the boot partition of the Jetson Nano, and you may need to flash everything from scratch using a host computer.
To flash your Jetson Nano, the easiest setup is to have a host computer with Linux and install the Nvidia SDK or the Nvidia Jetson Linux Driver Packages (L4T) on it. I recommend downloading the L4T as it's compatible with more Linux distributions. To do so and then flash the jetson, you can follow the instructions in this forum post. But here's a quick summary of the steps you need to take:
Basically, you need to download L4T from the Nvidia website. For Jetson Nano, use the Jetson Linux 32.7.x series instead of a newer JetPack branch. After clicking on the version, you need to download the Driver Package (BSP) and the Sample Root Filesystem. Extract the driver package without sudo, and extract the sample root filesystem with sudo to Linux_for_Tegra/rootfs/
After extracting the sample root filesystem, you need run this command to apply the binaries:
sudo ./apply_binaries.shNow, connect your Jetson Nano to your host computer via micro USB. For that, you need to have the Jetson Nano powered by a 5V power supply.
Here's an example of the command to flash the Jetson Nano with your custom DTB file. This needs to be run from your host computer, so make sure you copied the custom DTB file from your Jetson Nano to your host computer first. Replace the path with yours.
sudo ./flash.sh -k DTB

-d /path/to/your/file/kernel_tegra210-p3448-0000-p3449-0000-b00-user-custom.dtb

jetson-nano-devkit mmcblk1p1
To flash successfully, you may need to set the Jetson Nano into "Recovery Mode". You do that by first plugging the Jetson Nano to a 5V power supply (not via micro USB). Then, "jump" the pin called "FC RCV" (force recovery), i.e. connect the "FC RCV" pin to one of the "GND" pin. Use a jumper wire, a paperclip, or a small screwdriver. Then, jump the "SYS_RST" (system reset) pin to the "GND" pin and finally reboot the Jetson Nano. Now you can use the micro USB to connect the Jetson Nano to your host computer. Check the connection on your host computer with:
lsusb | grep -i nvidiaYou'll still need to eventually add the systemd service we created in Step 3 to make sure the pins are always set correctly on boot.