How to Install and Run AudioSR from GitHub?
AudioSR generates missing high-frequency detail in speech, music, and sound effects to produce 48 kHz audio. You can install it from the official GitHub repository or run AudioSR online with Neural Analog.
How Does AudioSR Work? Architecture Explained
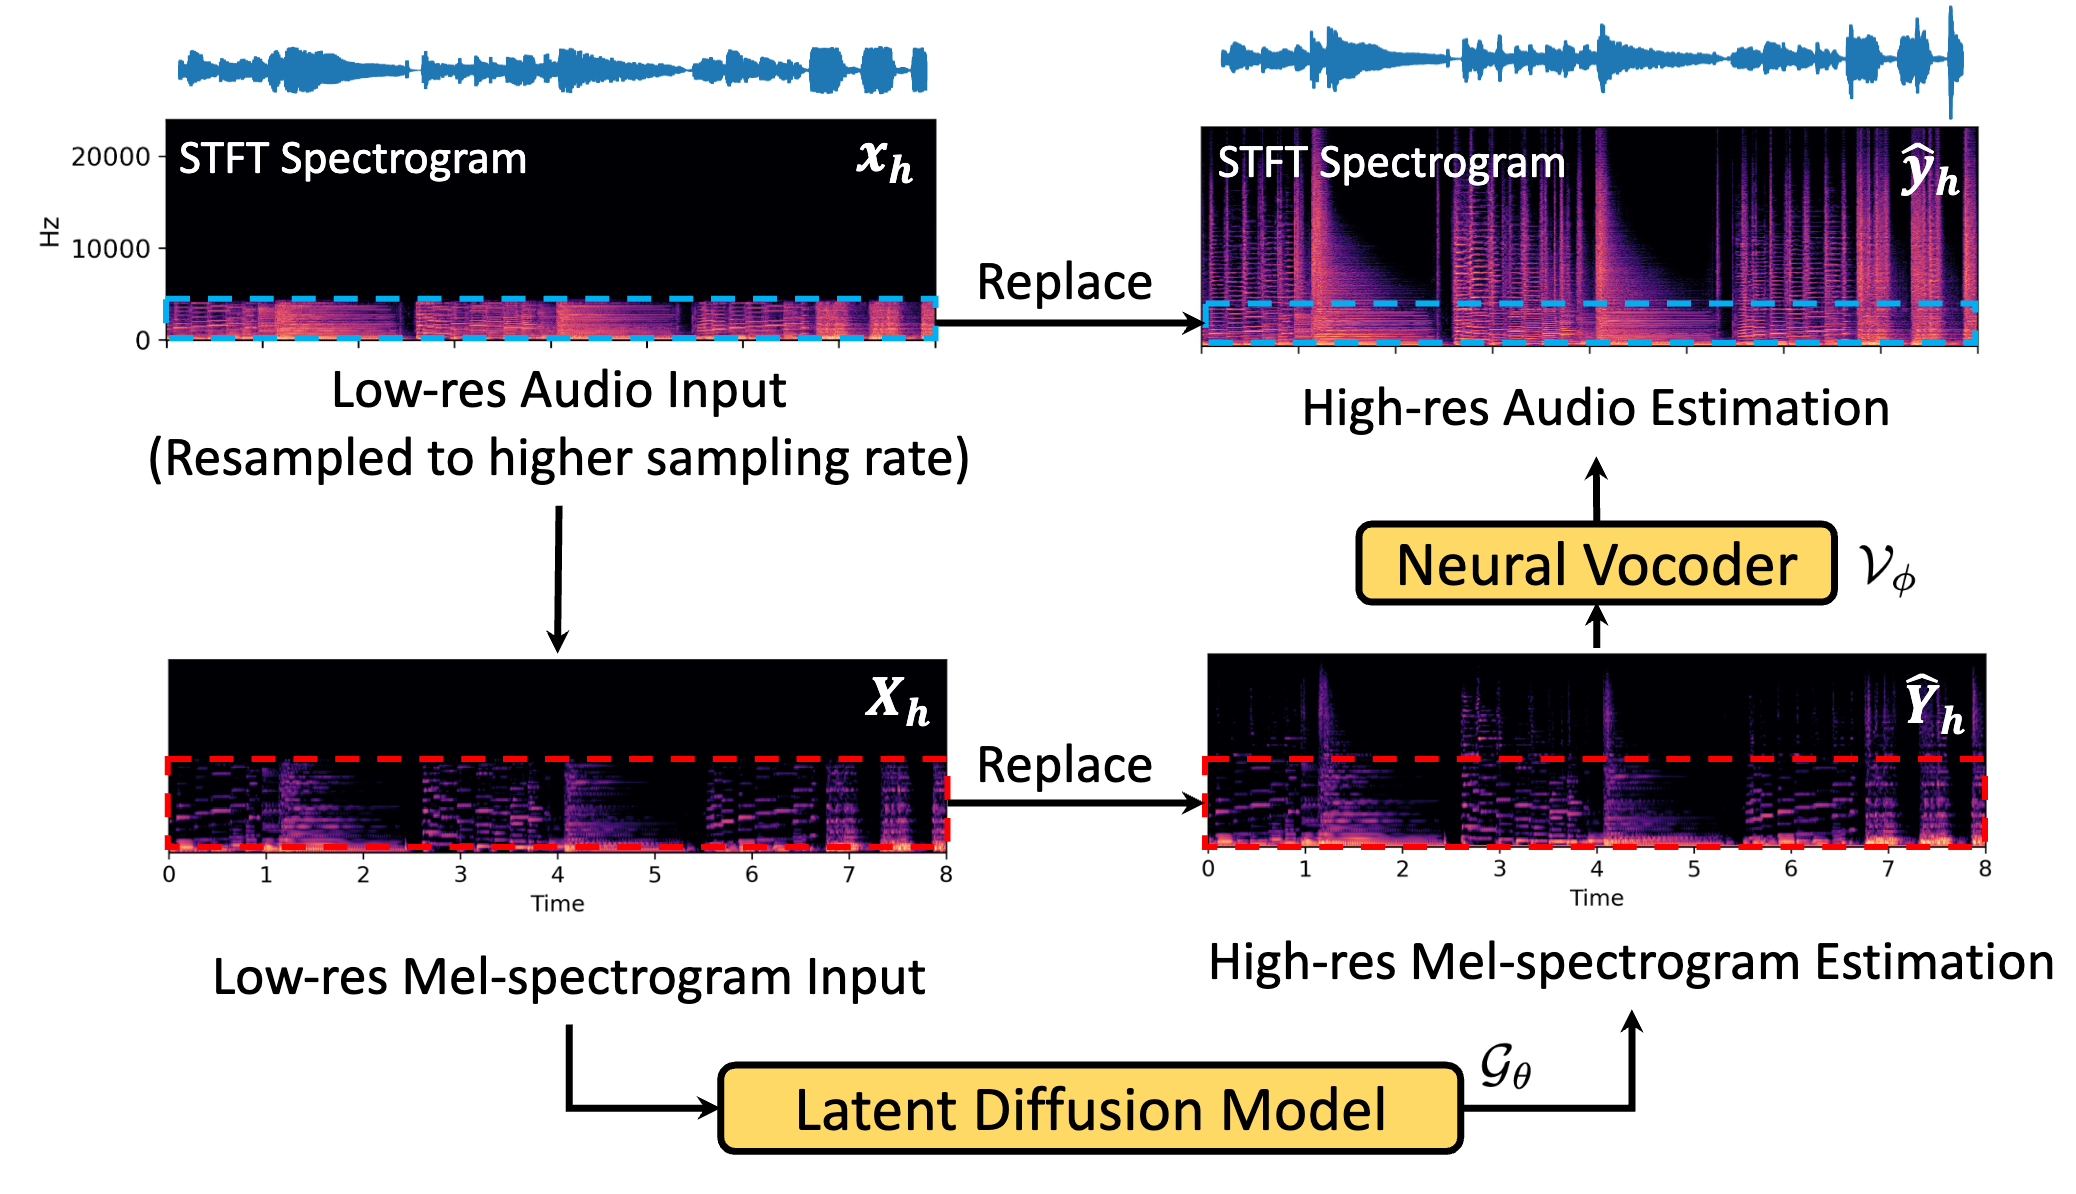
The authors' architecture diagram. The replacement paths carry existing low-frequency information into the generated result. Source: AudioSR project page.
AudioSR maps the recording's frequencies, uses a diffusion model to estimate missing detail, and converts that representation back into an audio waveform. Postprocessing combines the source's lower frequencies with the generated high frequencies. The result is a plausible reconstruction, rather than an exact recovery of lost audio.
Where Can You Run AudioSR?
| Option | Best fit | Setup and tradeoff |
|---|---|---|
| Neural Analog AudioSR Online — Recommended | Stereo restoration with mid/side processing and a customizable frequency cutoff | Upload, preview, and export online. No Python installation or local GPU needed. |
| Official GitHub repo | Local experiments and Python scripts | Install dependencies, download weights, and supply the compute. |
| AudioSR Colab notebook | Experiments using Google's cloud GPUs | Open the community notebook and follow its instructions in your browser. |
| Hugging Face Space | A quick browser demo | Community deployment; availability and GPU quotas can change. |
| AudioSR on Replicate | Hosted predictions and API integration | Usage-based billing; no local model installation. |
Neural Analog processes the center and side information of stereo audio separately. You can customize the frequency threshold where AudioSR starts regenerating detail: a lower cutoff applies a stronger effect, while a higher cutoff focuses on the top end.
AudioSR Requirements: Python, GPU Memory, and Disk Space
AudioSR is a heavy model, especially for full songs. The official basic checkpoint is about 6.2 GB on disk, and inference needs memory beyond the stored weights. A large NVIDIA GPU is useful, but checkpoint size is not a minimum VRAM specification: clip length and implementation also affect memory use. The official README does not publish a universal minimum GPU requirement.
Long inputs can exhaust GPU memory. Start with a short clip, then use smaller chunks for longer recordings to limit the amount of audio processed at once.
Prepare these dependencies before starting:
- Python in an isolated environment. The upstream example uses Python 3.9. This guide uses Python 3.10, which fits the older NumPy dependency range without installing packages into your system Python.
- Git and uv. Install Git and uv to download the source and manage the Python environment.
- PyTorch and an appropriate GPU driver. NVIDIA users need a CUDA-compatible PyTorch build. Match the PyTorch, TorchAudio, and TorchVision versions using the official installation matrix.
- FFmpeg, including ffprobe. The upstream file-saving code uses these commands. Install them through the FFmpeg download options and make them available in your terminal.
- Free disk space and an internet connection. Allow space for the environment, downloaded model weights, input files, and outputs. The first model load downloads its checkpoint.
The upstream device selection code recognizes CUDA, Apple MPS, and CPU. CPU processing can be very slow; recognizing MPS does not guarantee that every dependency and operation works on every Mac.
How to Install AudioSR from GitHub
1. Download the Official Repo and Create a Python Environment
Run these commands in a terminal:
git clone https://github.com/haoheliu/versatile_audio_super_resolution.git
cd versatile_audio_super_resolution
uv venv --python 3.10
Activate the environment on Linux or macOS:
source .venv/bin/activateOn Windows PowerShell, use this activation command instead:
.venv\Scripts\Activate.ps12. Install Compatible Dependencies and AudioSR
AudioSR has older dependency constraints, including NumPy 1.23.5 or earlier and Transformers 4.30.2. Installing the newest Python and PyTorch blindly can cause compatibility errors. The project's package requirements and reference environment are useful starting points.
For example, the reference environment pairs PyTorch 2.0.1, TorchAudio 2.0.2, and TorchVision 0.15.2. On Linux or Windows with a suitable NVIDIA driver, install that CUDA 11.7 combination, then the checked-out AudioSR source:
uv pip install torch==2.0.1 torchaudio==2.0.2 torchvision==0.15.2 --index-url https://download.pytorch.org/whl/cu117
uv pip install .
python -m audiosr --help
The CUDA command is for NVIDIA systems. Use the matching macOS or CPU instructions in the PyTorch matrix for those devices. These are legacy dependency versions; keep this environment separate from other Python projects.
If you only need the published package, the official README also documents audiosr==0.0.7. That release and GitHub's current main branch can have different features; check python -m audiosr --help for the version you installed.
3. Check That Python Can See Your GPU
Run this check inside the activated environment on an NVIDIA machine:
python -c "import torch; print('CUDA available:', torch.cuda.is_available())"
ffmpeg -version
ffprobe -version
If CUDA is unavailable, fix the driver or PyTorch installation before starting a long job. Adding -d cuda to AudioSR cannot make an unavailable GPU work.
AudioSR Command-Line Usage: Start with a Short WAV
Use a short mono WAV for the first run. The upstream audio loader recommends 5.12-second inputs and warns about quality beyond 10.24 seconds. Starting with a full song makes setup and memory problems harder to diagnose.
Put input.wav in the repository directory, then run:
python -m audiosr -i input.wav -s output --model_name basic -d cuda --ddim_steps 50 --seed 42The command-line implementation saves 48 kHz WAV output in a timestamped folder under output. Use basic for general audio or speech for spoken recordings. The seed controls the generated variation; comparing a few seeds can help you choose a better result.
If generation finishes but saving raises numpy.ndarray has no attribute cpu, use the Python example below to write the output directly. In the GitHub source checked for this guide, inference returns a NumPy array but the file-saving function expects a tensor. That is an upstream output-type mismatch, not a GPU memory error.
Current GitHub code also exposes chunking for longer files:
python -m audiosr -i input.wav -s output --model_name basic -d cuda --ddim_steps 50 --chunking --chunk_duration 5 --overlap_duration 1Chunking processes smaller sections and blends their overlaps. It reduces the amount of audio processed at once, but adds joins to inspect. These flags are version-specific, and the upstream chunked path mixes stereo input to mono. Keep the original stereo file.
How to Use AudioSR from Python
Use the Python API when you want to incorporate AudioSR into a script. The example below runs a short mono file, trims padding to the input duration, and writes a 48 kHz WAV. Save it as run_audiosr.py in the repository directory.
import numpy as np
import soundfile as sf
import torch
from audiosr import build_model, super_resolution

model = build_model(model_name="basic", device="cuda")
waveform = super_resolution(
  model,
  "input.wav",
  seed=42,
  ddim_steps=50,
  guidance_scale=3.5,
)
if isinstance(waveform, torch.Tensor):
  waveform = waveform.detach().cpu().numpy()
audio = np.asarray(waveform)[0, 0]
input_info = sf.info("input.wav")
output_samples = round(input_info.frames * 48000 / input_info.samplerate)
sf.write("output.wav", audio[:output_samples], 48000, subtype="PCM_24")
python run_audiosr.pyThe Python pipeline loads the model once, so a batch-processing script can reuse it. Set the number of sampling steps explicitly: the Python API and CLI do not necessarily use the same defaults.
How to Run AudioSR in Google Colab
Google Colab lets you run AudioSR using Google's cloud hardware. Open the community AudioSR Colab notebook and follow its instructions to load your audio, run the model, and save the result. You use the notebook in your browser, with no Python installation or GPU needed on your computer.
The notebook is a community adaptation of AudioSR. Its source is available on GitHub.
Where to Download AudioSR Model Weights?
Download the AudioSR model weights on Hugging Face.
AudioSR Model Details: Architecture, Training, and History
Who Created AudioSR?
AudioSR is a generative audio super-resolution model by Haohe Liu, Ke Chen, Qiao Tian, Wenwu Wang, and Mark D. Plumbley. It predicts missing high frequencies in speech, music, and sound effects and produces 48 kHz audio. The AudioSR research page includes the paper and listening examples. The work first appeared as a September 2023 preprint and was published at ICASSP 2024.
AudioSR generates plausible detail; it cannot recover an exact copy of a lost studio master. Simply converting an MP3 to a 48 kHz WAV does not perform the same reconstruction. For that distinction, see the guide to upscaling MP3 files to WAV.
Audio Upscaling, Resampling, and Bandwidth Are Different
Resampling changes how many samples represent each second of audio. Audio upscaling, or super-resolution, tries to estimate frequency content that the recording no longer contains. For example, resampling an 8 kHz recording to 48 kHz gives it more samples, but does not by itself restore sounds above its original 4 kHz frequency limit.
AudioSR targets input bandwidths from 2 to 16 kHz and generates output with a 24 kHz bandwidth at a 48 kHz sample rate, according to the official project description. Bandwidth describes the frequency range; sample rate describes samples per second. A file labeled 48 kHz can still have a narrow bandwidth because of earlier compression or filtering.
Was AudioSR the First Audio Upscaling Model?
AudioSR was not the first neural audio upscaler. Kuleshov, Enam, and Ermon published Audio Super Resolution using Neural Networks in 2017; diffusion-based speech upscaling also preceded AudioSR.
The narrower contribution matters: the AudioSR paper presents it as the first system covering the general audible domain, including music, speech, and sound effects. It combines that breadth with flexible input bandwidth, rather than introducing audio super-resolution itself.
From the Input Recording to a 48 kHz Waveform
AudioSR combines a variational autoencoder (VAE), a conditional latent diffusion model, and a neural vocoder. Each component handles a stage of the reconstruction:
| Stage | What happens | Why it matters |
|---|---|---|
| Audio representation | The input becomes a mel spectrogram: a map of sound energy across time and frequency. | The model works with patterns of frequency content. |
| VAE encoding | An encoder compresses the spectrogram into a smaller representation called a latent. | Diffusion operates on fewer values than a full spectrogram. |
| Conditional diffusion | A Transformer U-Net iteratively refines a noisy latent, guided by the low-resolution input latent. | The recording guides the generated detail; no text prompt is needed. |
| Decoding and vocoder | The VAE decodes a higher-resolution mel spectrogram. A HiFi-GAN-based vocoder turns it into a waveform. | A spectrogram must be converted back into audible samples. |
| Frequency replacement | Lower-frequency information from the input replaces corresponding generated bands. | Existing information helps constrain changes to the recording. |
The published model configuration specifies a 256-band mel representation, a VAE, and a U-Net with spatial transformers. It concatenates the input's encoded low-pass features with the diffusion latent. This is audio-conditioned generation, even though some inherited CLI descriptions mention text.
What Do Sampling Steps and Guidance Control?
Sampling steps control how many iterations the model spends refining its generated representation. AudioSR uses a DDIM sampler. Guidance controls the influence of the input conditioning during generation; it is not an EQ amount or a guarantee of higher quality. The inference implementation applies sampling, decoding, frequency replacement, and waveform normalization in sequence.
More sampling steps and longer recordings take more processing time. AudioSR is intended for offline processing; actual speed depends on your GPU and settings. Reducing ddim_steps speeds up generation, but does not reliably solve GPU memory errors.
How Was AudioSR Trained?
The paper's training section describes approximately 7,000 hours from MUSDB18-HQ, MoisesDB, MedleyDB, Freesound, and OpenSLR speech data. Low-pass filters with varied cutoffs create degraded inputs paired with fuller-bandwidth targets. The diffusion model uses a cosine noise schedule, velocity prediction, and classifier-free guidance; the vocoder is based on HiFi-GAN with a multi-resolution discriminator.
Real recordings can differ from these training examples. The authors explain that irregular frequency cutoffs, heavy noise, and reverb can reduce quality. MP3 compression can leave gaps near the cutoff; low-pass filtering before inference can help, but setting the cutoff too low removes useful detail.
You do not need to train these components to run AudioSR. The installation workflow loads pretrained weights.
Why Does AudioSR Use Postprocessing?
The generated audio should retain useful information that already exists in the source. AudioSR replaces lower bands twice: in the estimated mel spectrogram before the vocoder, and in the short-time Fourier transform (STFT) representation of the resulting waveform. The replacement code estimates a cutoff and adjusts the reconstructed output.
Stereo recordings and full songs need a pipeline that handles channels, chunks, and reconstruction. The default repository workflow produces mono audio: the standard loader takes the first input channel, while the chunked pipeline downmixes stereo to mono. Preserving stereo requires additional channel handling, such as the community notebook's separate processing of left and right channels.
Reconstruction needs a listening check. The community pipeline notes warn that excessive overlap can cause phase cancellations. Compare the result at similar loudness and check the regenerated highs, chunk joins, duration, and stereo image. Frequency replacement helps preserve the source, but does not guarantee an unchanged lower band or seamless output.
Run AudioSR with Neural Analog Instead of Managing the Setup
For an integrated audio workflow, open AudioSR Online, upload a file or import a supported music link, and adjust the restoration settings. You can choose a frequency cutoff, preview the processed result, and export audio from the same interface.
Neural Analog handles the model processing online, so you can use a computer without a large GPU and skip Python installation, checkpoint downloads, and notebook maintenance. You still need to listen critically: using a hosted workflow does not remove the model's quality limitations. After restoration, follow the audio improvement guide for the next steps.
You can also compare AudioSR with newer audio upscaling models available on Neural Analog, including UniverSR and FlashSR. Their model cards explain how each works. Try them on the same recording and compare the previews to choose the result you prefer.